Info:
How to Design Your Own Mobile Phone Tutorial
All you will need is Adobe Photoshop (CS, CS2, CS3 or CS4).
After following the steps in this tutorial you should end up with something like this:
So let’s start,
open a new photoshop document, and set the width and height to 450×615 pixels and resolution to 72 pixels/inch.Using the gradient tool (G). Set mode to Normal and opacity to 100%. Set a nice gradient going from light to dark and with the gradient tool go from the top to the bottom of the document.
Create a new layer (Layer> new> new layer) and take the Rounded rectangle tool (U).
![]()
Make the basic outline of your phone. Now in the right bottom corner of the layer case right click on the layer with the shape, and select blending options. Set this options:


Now create a new layer and use the Rounded Rectangle tool (U) and set the radius to 12px.
Now with black foreground make a screen for your mobile leaving enaugh space for navigations
and buttons. Set the following Blending options for this layer:
Inner shadow: Angle 135
Rest default
Gradient Overlay: Opacity; 12%
Angle 90
Rest default
Stroke: Size: 1
Outside
Normal
Opacity: 54%
Fill type: gradient
Angle: -159
Scale: 100
Than on a new layer you will create the navigations. Take the Rounded rectangle tool and set radius to 20 px. You can make a close up to about 200% to make it button more neat. And make a small (about 45px high) button. now set the same blending options but add stain with this settings:

Now with the move tool (V) you can place it right in the center.
Using the text tool (T) And type in ‘OK’ or anything else you want. With the move tool place it on the button you created. And you can set some blending options for your text if want.
Create a new layer and make navigations. I want to make small arrows using the line
tool (U) or the text tool (T). Using the move tool place them around the button.
Hi everyone,
This is a updated tutorial on how to create your own mobile phone in Adobe Photoshop.
Please leave a comment or send me a message. if you have any problems.
All you will need is Adobe Photoshop (CS, CS2, CS3 or CS4).
After following the steps in this tutorial you should end up with something like this:
Reduced 20%
Attached Image
457 x 624 (21.57K)
So let’s start,
open a new photoshop document, and set the width and height to 450×615 pixels and resolution to 72 pixels/inch.Using the gradient tool (G). Set mode to Normal and opacity to 100%. Set a nice gradient going from light to dark and with the gradient tool go from the top to the bottom of the document.
Create a new layer (Layer> new> new layer) and take the Rounded rectangle tool (U).
Reduced 25%
Attached Image
662 x 28 (4.57K)
Make the basic outline of your phone. Now in the right bottom corner of the layer case right click on the layer with the shape, and select blending options. Set this options:
Attached Image
Attached Image
Attached Image
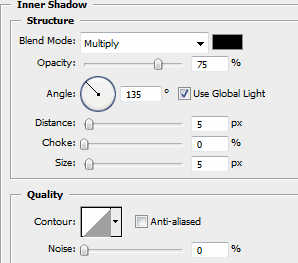
Now create a new layer and use the Rounded Rectangle tool (U) and set the radius to 12px.
Now with black foreground make a screen for your mobile leaving enaugh space for navigations
and buttons. Set the following Blending options for this layer:
Inner shadow: Angle 135
Rest default
Gradient Overlay: Opacity; 12%
Angle 90
Rest default
Stroke: Size: 1
Outside
Normal
Opacity: 54%
Fill type: gradient
Angle: -159
Scale: 100
Reduced 31%
Attached Image
536 x 717 (31.87K)
Than on a new layer you will create the navigations. Take the Rounded rectangle tool and set radius to 20 px. You can make a close up to about 200% to make it button more neat. And make a small (about 45px high) button. now set the same blending options but add stain with this settings:
Attached Image
Now with the move tool (V) you can place it right in the center.
Using the text tool (T) And type in ‘OK’ or anything else you want. With the move tool place it on the button you created. And you can set some blending options for your text if want.
Create a new layer and make navigations. I want to make small arrows using the line
tool (U) or the text tool (T). Using the move tool place them around the button.
On a new layer use the rounded rectangle tool (U) and set the ratius to 15px.
Make a small recangle on one side of the phone, something like that:

And it should set the previous blending options if not set them.
Now duplicate the layer and palce the button other side of the phone.
Using the text tool (T) type this symbol _ (Shift & -). Set the siye to 36 and font Arial
and set colour to green (10f020). Now duplicte this layer and set colour to red (fe0303)
With the move tool place red on right button and green on left button.
Now create a new layer, select the rounded rectangle tool (U) and set ratius to 7px.
Make a rectangle for the key pad. With the following blending options:
Hi everyone,
This is a updated tutorial on how to create your own mobile phone in Adobe Photoshop.
Please leave a comment or send me a message. if you have any problems.
All you will need is Adobe Photoshop (CS, CS2, CS3 or CS4).
After following the steps in this tutorial you should end up with something like this:
Reduced 20%
Attached Image
457 x 624 (21.57K)
So let’s start,
open a new photoshop document, and set the width and height to 450×615 pixels and resolution to 72 pixels/inch.Using the gradient tool (G). Set mode to Normal and opacity to 100%. Set a nice gradient going from light to dark and with the gradient tool go from the top to the bottom of the document.
Create a new layer (Layer> new> new layer) and take the Rounded rectangle tool (U).
Reduced 25%
Attached Image
662 x 28 (4.57K)
Make the basic outline of your phone. Now in the right bottom corner of the layer case right click on the layer with the shape, and select blending options. Set this options:
Attached Image
Attached Image
Attached Image
Now create a new layer and use the Rounded Rectangle tool (U) and set the radius to 12px.
Now with black foreground make a screen for your mobile leaving enaugh space for navigations
and buttons. Set the following Blending options for this layer:
Inner shadow: Angle 135
Rest default
Gradient Overlay: Opacity; 12%
Angle 90
Rest default
Stroke: Size: 1
Outside
Normal
Opacity: 54%
Fill type: gradient
Angle: -159
Scale: 100
Reduced 31%
Attached Image
536 x 717 (31.87K)
Than on a new layer you will create the navigations. Take the Rounded rectangle tool and set radius to 20 px. You can make a close up to about 200% to make it button more neat. And make a small (about 45px high) button. now set the same blending options but add stain with this settings:
Attached Image
Now with the move tool (V) you can place it right in the center.
Using the text tool (T) And type in ‘OK’ or anything else you want. With the move tool place it on the button you created. And you can set some blending options for your text if want.
Create a new layer and make navigations. I want to make small arrows using the line
tool (U) or the text tool (T). Using the move tool place them around the button.
Attached Image
On a new layer use the rounded rectangle tool (U) and set the ratius to 15px.
Make a small recangle on one side of the phone, something like that:
Attached Image
And it should set the previous blending options if not set them.
Now duplicate the layer and palce the button other side of the phone.
Using the text tool (T) type this symbol _ (Shift & -). Set the siye to 36 and font Arial
and set colour to green (10f020). Now duplicte this layer and set colour to red (fe0303)
With the move tool place red on right button and green on left button.
Now create a new layer, select the rounded rectangle tool (U) and set ratius to 7px.
Make a rectangle for the key pad. With the following blending options:
Attached Image Attached Image
Make a new layer and with the Rounded rectangle tool (U) make a bit smaller button than the
previous one but almost as wide. Now set this blending options for the layer:
Now duplicate this layer 12 times and place each button to form a nice 4 rows
and 3 colums of buttons like this:
Hi everyone,
This is a updated tutorial on how to create your own mobile phone in Adobe Photoshop.
Please leave a comment or send me a message. if you have any problems.
All you will need is Adobe Photoshop (CS, CS2, CS3 or CS4).
After following the steps in this tutorial you should end up with something like this:
Reduced 20%
Attached Image
457 x 624 (21.57K)
So let’s start,
open a new photoshop document, and set the width and height to 450×615 pixels and resolution to 72 pixels/inch.Using the gradient tool (G). Set mode to Normal and opacity to 100%. Set a nice gradient going from light to dark and with the gradient tool go from the top to the bottom of the document.
Create a new layer (Layer> new> new layer) and take the Rounded rectangle tool (U).
Reduced 25%
Attached Image
662 x 28 (4.57K)
Make the basic outline of your phone. Now in the right bottom corner of the layer case right click on the layer with the shape, and select blending options. Set this options:
Attached Image
Attached Image
Attached Image
Now create a new layer and use the Rounded Rectangle tool (U) and set the radius to 12px.
Now with black foreground make a screen for your mobile leaving enaugh space for navigations
and buttons. Set the following Blending options for this layer:
Inner shadow: Angle 135
Rest default
Gradient Overlay: Opacity; 12%
Angle 90
Rest default
Stroke: Size: 1
Outside
Normal
Opacity: 54%
Fill type: gradient
Angle: -159
Scale: 100
Reduced 31%
Attached Image
536 x 717 (31.87K)
Than on a new layer you will create the navigations. Take the Rounded rectangle tool and set radius to 20 px. You can make a close up to about 200% to make it button more neat. And make a small (about 45px high) button. now set the same blending options but add stain with this settings:
Attached Image
Now with the move tool (V) you can place it right in the center.
Using the text tool (T) And type in ‘OK’ or anything else you want. With the move tool place it on the button you created. And you can set some blending options for your text if want.
Create a new layer and make navigations. I want to make small arrows using the line
tool (U) or the text tool (T). Using the move tool place them around the button.
Attached Image
On a new layer use the rounded rectangle tool (U) and set the ratius to 15px.
Make a small recangle on one side of the phone, something like that:
Attached Image
And it should set the previous blending options if not set them.
Now duplicate the layer and palce the button other side of the phone.
Using the text tool (T) type this symbol _ (Shift & -). Set the siye to 36 and font Arial
and set colour to green (10f020). Now duplicte this layer and set colour to red (fe0303)
With the move tool place red on right button and green on left button.
Now create a new layer, select the rounded rectangle tool (U) and set ratius to 7px.
Make a rectangle for the key pad. With the following blending options:
Attached Image Attached Image
Make a new layer and with the Rounded rectangle tool (U) make a bit smaller button than the
previous one but almost as wide. Now set this blending options for the layer:
Attached Image Attached Image Attached Image
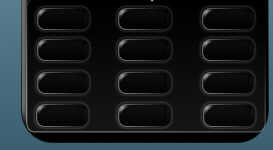
Now duplicate this layer 12 times and place each button to form a nice 4 rows
and 3 colums of buttons like this:
Now use the text tool (T) and type in the numbers on the keypad. I used size 24 pt
and asenine wide font (Regular) sharp and colour dark white (#dadada)
After that type in the alphabet latters but in arial font and size 12 pt.
When you done that you can add some symbols like set to silent.
Go to custom shape tool (U) and find a music note. than using the line tool
make line across it like this:
![]()
Now using the rounded rectangle tool (U) set ratius to 8px and on a new
layer make a rectangle for the speaker and set this blending options:
Inner shadow & Outer glow the ame as last time
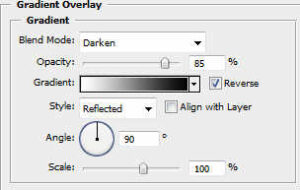
Now click on the layer with your basic shape of the phone and make a selection of it by holding ctrl and click. Create a new layer and take the gradient tool and set the gradient to some thing like this
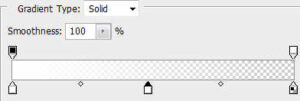
And set the opacity to 45%. Now go from left side to right.
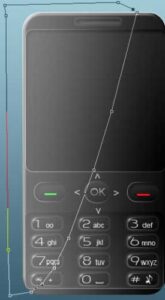
Using the pen tool (P) select the points on about half part of the phone
Than right click and make selection. Create a layer mask and now follow this steps.
Click on each layer individually and hold ctrl + click and it should select the part, than go to
the gradient layer which should be at the top and press delete. Do this to each part of the phone
that is covered in gradient apart from the basic shape. You might want to change the opacity in the layer style.
And that’s it!, You can add a wallpaper of your choice and change anything you want.

And there are lot’s of different ways and technics of crering your own design.
All Credits to Olek


